3D Product Rendering Workflow: A 2026 Guide

A 3D product rendering workflow is the structured process of converting digital product models into photorealistic visual assets optimized for marketing and e-commerce. Done well, it replaces costly physical photoshoots with repeatable digital production that scales across entire product catalogs. For designers and marketers, a disciplined workflow is the difference between a render that looks like a prototype screenshot and one that sells. This guide walks through every stage, from file intake to final delivery, with the tools, techniques, and standards that matter in 2026.
What does a 3D product rendering workflow involve?
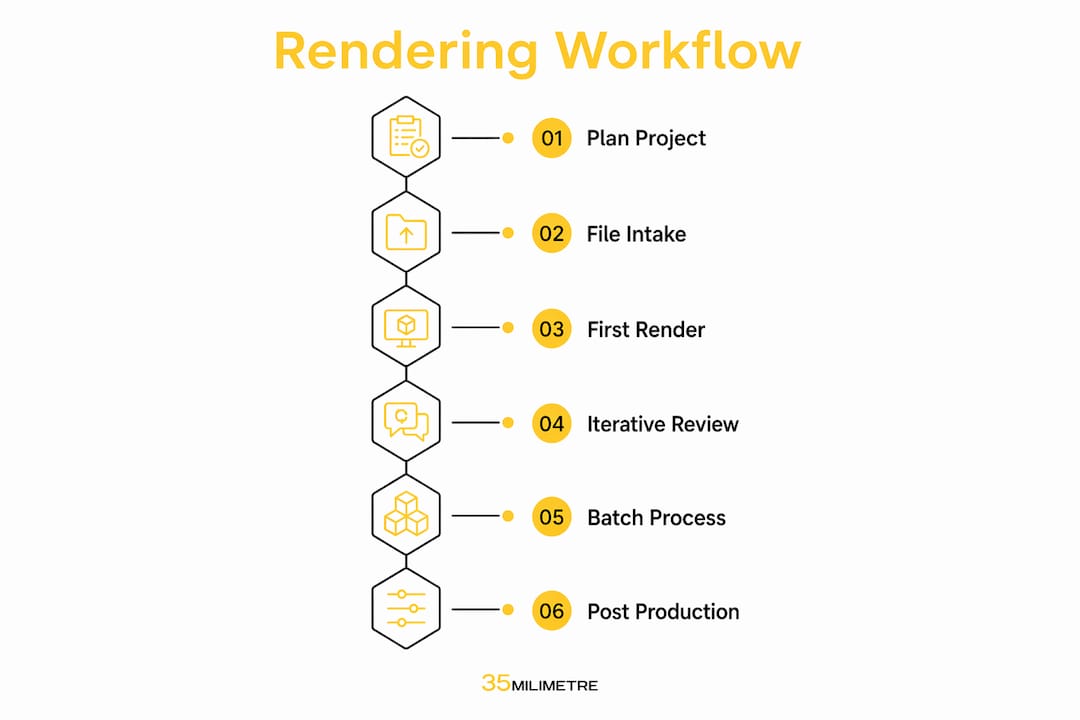
A 3D product rendering workflow covers six core stages: project planning, CAD file intake, first-in-series rendering, iterative revision, batch production, and post-production delivery. Each stage builds on the last. Skipping or rushing any one of them creates compounding problems downstream, from misaligned brand visuals to render crashes that cost hours of recovery time.
The industry standard for final deliverables is 2,000–4,000px images in PNG or WebP formats, with multiple view angles per product. That spec reflects what major e-commerce platforms and ad agencies actually require. Getting there efficiently means treating the workflow as a production pipeline, not a series of one-off creative decisions.
Scalable 3D rendering pipelines replace costly product photography cycles with repeatable digital asset creation across product variants. That shift is why more brands are moving rendering in-house or partnering with specialist studios rather than booking physical shoots for every SKU update.
What tools and prerequisites do you need?
The right tools for product rendering remove friction at every stage. The most important capability is native CAD format support. Tools supporting over 34 native 3D formats eliminate file conversion errors that corrupt geometry and slow down the entire pipeline. KeyShot Studio is one widely known example of software built around this principle. Conversion errors are not just annoying. They cause mesh failures, missing surfaces, and render crashes that can set a project back by a full day.
Hardware matters, but not in the way most designers expect. A fast GPU accelerates real-time preview and GPU-based render engines. A strong CPU still drives most production-grade render engines and handles scene calculations. The practical minimum for professional product rendering is a workstation with a dedicated GPU and at least 32GB of RAM. Anything less and complex scenes with high-polygon geometry will stall.
File preparation is the step most designers underestimate. Before a CAD model enters a render engine, it needs geometry simplification, hidden face removal, and mesh error correction. Raw CAD files often cause render engine crashes if not converted properly to render-ready assets. This conversion step is not optional. It is the foundation of a stable, efficient 3D rendering process.

AI tools are now a real accelerator in the workflow, but with an important caveat. AI tools that ingest actual product geometry maintain brand safety better than generic image-to-image AI tools, which risk producing hallucinated product details. For brand-critical work, geometry-based AI is the right call. For concept exploration, image-based AI can speed up early ideation.
Pro Tip: Build a pre-flight checklist for every incoming CAD file. Check for watertight geometry, duplicate faces, and scale accuracy before you open the file in your render engine. Ten minutes of checking saves two hours of troubleshooting.
Here is a quick reference for the core prerequisites:
| Requirement | Minimum standard |
|---|---|
| Image output resolution | 2,000–4,000px per side |
| File formats | PNG, WebP |
| CAD format support | 34+ native formats |
| RAM | 32GB minimum |
| GPU | Dedicated, VRAM 8GB+ |
How to create 3D renderings step by step
A structured 3D rendering process starts before anyone opens a render engine. The first stage is project planning and client alignment. Define the product scope, the number of SKUs, the required view angles, and the brand visual standards. Poor alignment at this stage is the leading cause of revision cycles that blow past deadlines.
The second stage is CAD file intake and evaluation. Receive the files, run your pre-flight checklist, and convert geometry to render-ready assets. Fix meshes, remove hidden faces, and simplify polygon counts where the detail is not visible in the final render. This stage determines how stable and fast the rest of the process will be.
The third stage is creating first-in-series (FIS) renders. FIS renderings freeze the visual brand language before full production begins. You establish lighting, materials, camera angles, and background treatment on a single hero product. The client approves this visual standard, and every subsequent render in the series matches it. This single step reduces total revision cycles more than any other practice in the workflow.
The fourth stage is iterative revision on the FIS render. Collect feedback, make adjustments, and get sign-off before scaling. Trying to revise 50 renders after the fact is far more expensive than revising one render three times before production.
The fifth stage is batch processing. Once the FIS is approved, apply the locked camera presets, material libraries, and lighting setups across the full product family. Automation handles the repetitive work. Your team focuses on quality checking and exception handling.
The sixth stage is post-production and delivery. Color correction, retouching, and background treatments are the final steps before delivery. These steps are not cosmetic extras. They bring renders up to the standard that brand guidelines and platform requirements demand. Deliver files at the agreed resolution and format, organized by SKU and view angle.
Pro Tip: Lock your FIS render in writing before batch production starts. A signed-off visual reference document prevents scope creep and protects both your timeline and your client relationship.
How do lighting, materials, and camera setup affect photorealism?
Lighting is the most critical factor for photorealism in product visualization. A perfectly modeled product with flat ambient lighting looks unconvincing. The same model with layered HDRI and IES light profiles looks like a photograph. The difference is not the geometry. It is the light.
HDRI (High Dynamic Range Image) lighting wraps the scene in real-world light data captured from actual environments. It creates accurate reflections, soft shadows, and color temperature that ambient light cannot replicate. IES profiles add artificial light sources, like studio strobes or retail spotlights, with physically accurate falloff. Together, they give product renders the depth and dimensionality that makes a viewer believe what they are seeing.
Material setup is equally important. A standardized material library, built once and reused across projects, keeps surface properties consistent across a product family. Gloss levels, roughness maps, and subsurface scattering values should be documented and version-controlled. Ad hoc material decisions made per render create visual inconsistency that undermines brand identity.
Camera setup defines how the product is perceived. The three most used angles in product visualization are the hero shot (straight-on or slight elevation), the three-quarter view (showing depth and form), and the detail shot (close-up of texture, finish, or feature). Each angle serves a different purpose in the marketing funnel. Hero shots anchor catalog pages. Three-quarter views work in ads. Detail shots support premium positioning. You can read more about 3D visualization techniques that cover these setups in depth.
Pro Tip: Save camera presets as named views in your scene file. Label them by angle type and product line. This makes batch rendering faster and keeps every SKU visually consistent without manual repositioning.
How do you troubleshoot and scale a rendering workflow?
The most common rendering problems share a root cause: unoptimized geometry entering the render engine. Render crashes, excessive render times, and missing surfaces all trace back to CAD files that were not properly prepared. Removing hidden faces, fixing meshes, and simplifying geometry prevents these failures before they happen.
Long render times are the second most common complaint. AI denoising, available in most modern render engines, cuts render time significantly by cleaning up noise at lower sample counts. Native render engine plugins that connect directly to CAD software also reduce the round-trip time between modeling and rendering. Both tools are worth integrating early in your pipeline setup.
Scaling a workflow across large SKU catalogs requires three things: repeatable presets, a variant library, and a quality-check protocol. Repeatable presets for camera, lighting, and materials mean each new product enters a pre-configured scene. A variant library stores approved material swatches, color options, and finish types so they can be applied without rebuilding from scratch. A quality-check protocol catches errors before delivery, not after.
Standardizing camera presets, material libraries, and lighting across product lines enables efficient management of large SKU catalogs without repeat photoshoots. That is the core efficiency argument for investing in workflow standardization. The upfront cost of building the system pays back on every project that follows. For more on efficient 3D product design practices, the principles of native format support and scene organization apply directly here.
Key takeaways
A disciplined 3D product rendering workflow, built on FIS renders, standardized presets, and proper CAD preparation, is the most reliable path to consistent, scalable product visuals.
| Point | Details |
|---|---|
| Prepare CAD files first | Remove hidden faces and fix meshes before importing to prevent crashes and speed up renders. |
| Use FIS renders to lock visual standards | Approve one hero render before batch production to reduce revision cycles across the full SKU set. |
| Prioritize lighting over geometry | HDRI and IES profiles create photorealism; flat ambient lighting undermines even well-modeled products. |
| Standardize presets for scale | Locked camera, material, and lighting presets make large catalog production repeatable and consistent. |
| Post-production is not optional | Color correction, retouching, and background treatment bring renders to platform and brand standards. |
What we have learned from two decades of rendering projects
The biggest inefficiency we see in product rendering workflows is not slow hardware or outdated software. It is misalignment between the creative team and the client before production starts. Projects that skip a proper FIS review almost always require full-scene rebuilds later. That is not a technical failure. It is a process failure.
We have also watched the AI conversation in rendering go through two phases. The first phase was excitement about image-to-image tools that could generate product-looking visuals from text prompts. The second phase, where we are now, is the recognition that those tools hallucinate product details. For brand-critical work, geometry-based AI that reads actual 3D data is the only responsible choice. The role of AI in creative studios is real and growing, but it requires the right implementation.
The most underrated efficiency gain in any rendering pipeline is the material library. Studios that build and maintain a well-organized material library cut setup time on new projects by a significant margin. It sounds unglamorous, but it is one of the highest-leverage investments a rendering team can make.
One more thing: post-production is where renders become assets. Raw renders, even excellent ones, rarely meet the standard for direct publication. Color grading, compositing, and retouching are what close the gap between a technically correct render and a visually compelling one. Treating post-production as an afterthought is one of the most common ways teams undercut their own work.
— 35mm
Professional post-production support for your rendering pipeline
35milimetre has spent over two decades working at the intersection of 3D production and post-production for technology and automotive brands. The studio’s team includes a dedicated 3D artist, a post-production specialist, and a graphic designer who work together on projects from CAD intake through final delivery.

For designers and marketers who have the rendering side covered but need expert post-production to bring assets to publication standard, 35milimetre’s visual post-production services cover color grading, compositing, retouching, and background treatment. The studio also supports teams that need to enhance product images for e-commerce platforms where image quality directly affects conversion. If your renders are good but your final assets are not landing the way you want, that gap is exactly what 35milimetre closes.
FAQ
What is a 3D product rendering workflow?
A 3D product rendering workflow is the end-to-end process of converting CAD or 3D models into photorealistic marketing images, covering file preparation, scene setup, rendering, and post-production. The standard output is 2,000–4,000px images in PNG or WebP format across multiple view angles.
Why do render engines crash on CAD files?
Raw CAD files contain hidden faces, mesh errors, and overly complex geometry that render engines cannot process reliably. Fixing meshes and simplifying geometry before import prevents crashes and cuts render times.
What is a first-in-series render and why does it matter?
A first-in-series render is a single approved hero render that locks the visual brand language, including lighting, materials, and camera angles, before full batch production begins. It reduces revision cycles across the entire product family.
How does lighting affect photorealism in product renders?
Lighting is the defining factor for photorealism. HDRI environments and IES light profiles create accurate shadows, reflections, and depth that flat ambient lighting cannot replicate, regardless of model quality.
Can AI tools replace traditional 3D rendering workflows?
AI tools accelerate specific stages but do not replace the full workflow. Geometry-based AI maintains brand accuracy, while image-to-image AI tools risk generating hallucinated product details that fail brand standards.